Henan Forever Medical Co., Ltd.
Business Type:Manufacturer
Country/Region:China
Ddu Verified
HOT Rank


Henan Forever Medical Co., Ltd.
We are professional supplier of Ultrasound Scannner,Anesthesia Analyzer,Patient Monitor,Hematology Analyzer,X-ray machine,Deep freezer/refrigerator,Biochemistry analyzer,Face Mask ,Surgical Coat,Corps


Business Type:Manufacturer
Country/Region:China
Ddu Verified
HOT Rank
Instruction Manual
YJ-AN18


Thank you for choosing our steam sterilizers.
Prior to operating this instrument, please read the operations manual carefully and follow
all installation instructions.
Caution: Be sure connect the exhaust tube and discharge container before start the sterilizer.
Instruction Manual
YJ-AN18
Henan Forever Medical Co., Ltd.
Wanda Center,Jinshui District,
Zhengzhou, China.
www.yongjiumed.com
Subject to technical changes
Technical Specifications
| Specifications | ||
| Model Number | YJ-AN18 | |
| Electrical supply | 220-240 VAC | 110-100 VAC |
| Chamber (mm, diameter/depth) | Ø230×360 mm | |
| Power (VA) | 1100 VAC | |
| Sterilization temperature (°C) | 121 °C | 134 °C |
| Overall dimensions (mm) | 605 (width)x445(height)x400(depth) | |
| Net weight (kg) | 30 kg | |
| Sterilization time | 121 °C | 30 min. |
| 134 °C | 10 min. | |
Packing content
| Sterilizer | 1 |
| Rack | 1 |
| Trays holder | 1 |
| Trays | 2 |
| Exhaust tube | 2 |
Description
Installation
the autoclave to an appropriate power supply could result in damage to the unit, and electrical shock to personnel.
Setup
Open the door and remove all the inner contents for unpacking.
Connect the power cord to an outlet of the appropriate voltage. (See installation).
Connect the draining tube to the vent and the end of the draining tube is fixed into the discharge container (preferably a metal container; if it is a plastic container, make sure that the container is filled with a part of cold water to prevent high temperature deformation).
To power on, press the main switch, the machine turns on the LED.
Note: If the door is open, the display will show "do"; When the door is closed, the display will show "Ld".
Preparation of sterilization materials
For the most effective sterilization and to preserve the sample, please follow below:
between them.
Operation
Close the exhaust valve by turning it clockwise to the maximum position.
Fill with the chamber with distilled water (or deionized water).
Select the program temperature.
After selecting program, the materials to be sterilized can now be placed on the tray placed inside the chamber using the tray handle.
After the instruments are loaded, you may close the chamber door. The display will show the current internal temperature.
Caution: You must turn the door handle to the maximum position.
Start the sterilization program.
After the Start button is pressed, the sterilizers will begin the cycle automatically.
Note:
The draining tube must be always connected to the vent and the end of the draining tube must be fixed into the discharge container.
End of cycle
After the sterilization is complete, you will hear a beep and the screen will show "End".
Then you can open the door to remove the sterilized items.
Note:
After the screen shows End, if the gauge is pointer different than 0 bar, do not open the door until it down to zero-scale position.
Note:
After each cycle check the water level of the chamber.
| Program | Type | Max. Load (kg) | Max. Load per tray (kg) |
| 121 °C / 134 °C | Unwrapped solid material | 2.4 | 1.2 |
Error codes
| Code | Description | Proposed solution |
| E2 | Chamber overheating | Check temperature sensor connection. |
| E4 | Heating overtime | Somewhere is leaking. Check the door seal. Heater malfunction. |
| E6 | During operation, the door has been opened or the door micro switch is damaged. | Confirm that the door handle has been closed to the maximum position. Check or replace the door micro switch |
Maintenance
| Frequency | Maintenance Operation |
| Monthly | Clean the door seal. |
| Weekly | Clean the chamber, the trays and the rack. |
| Every Year | Replace the door seal. |
Clean Chamber, Trays, Door Seal, chamber filter and Tray Rack.
Remove the trays and tray rack from the chamber. Clean trays, rack and inside of chamber with mild soap.
Rinse the trays, rack and inside of chamber with a smooth cloth and distilled water.
Examine gaskets for possible damage.
Clean gasket and mating surfaces with a damp cloth.
Note: Do not use bleaching agents or any abrasive materials / substances in chamber. Failure to comply may result in damage to the chamber and/or other components.
Caution: To prevent burns, allow unit to cool before cleaning gaskets and mating surfaces.
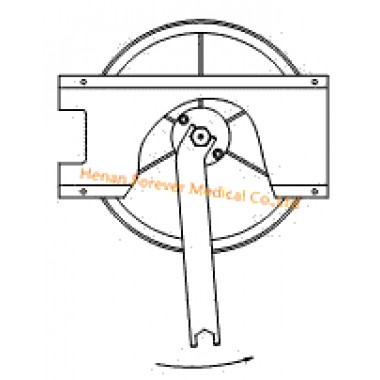
Door adjustment
Under normal circumstances the chamber door does not require adjustments. However, if the seal
fails (resulting in steam leaking from the front of the chamber), you may use the spanner tool to
tighten the door seal.
Open the door and Insert the spanner tool in the gap beneath the plastic cover; use the spanner to grip the adjusting nut.
Turn the nut counter clockwise. This will tighten the sealing plate.
Turn the nut until the sealing plate is tight. If the door knob is too tight, you may also turn the nut clockwise to loosen it.
Replacement of the door seal
Open the chamber door. Remove the door
seal ring carefully by hand.
Clean the door seal ring carefully with a
smooth cloth with distilled water.
Moisten the new seal with medical
disinfectant or isopropyl alcohol.
Insert the new seal and press in sequence
as follows:
Caution: Please ensure the chamber and the
door have cooled prior to replacing the seal ring.